Editor’s note » This is part three of a three-part series on carburized steel mechanical properties.
In Part 2, it was determined that a test bar must have a radius or stress concentration in order to predict what will happen with a carburized gear loaded in bending. It was also determined a new test bar was needed that could more accurately represent a differential gear that was unable to pass a vehicle impact test. The test bar must have the capability to be easily tested under slow bend, bending impact, and bending fatigue conditions. The decision was to use an oversized Charpy bar with a simulated gear root radius rather than a V-Notch [1]. The oversized Charpy bar was called a U-Notch Bar and was 12.7 mm square by 63.5 mm in length with 50.80 mm between supports (Figure 1). The radius was 2.29 mm and the cross section at the bottom of the radius was 10.80 mm.
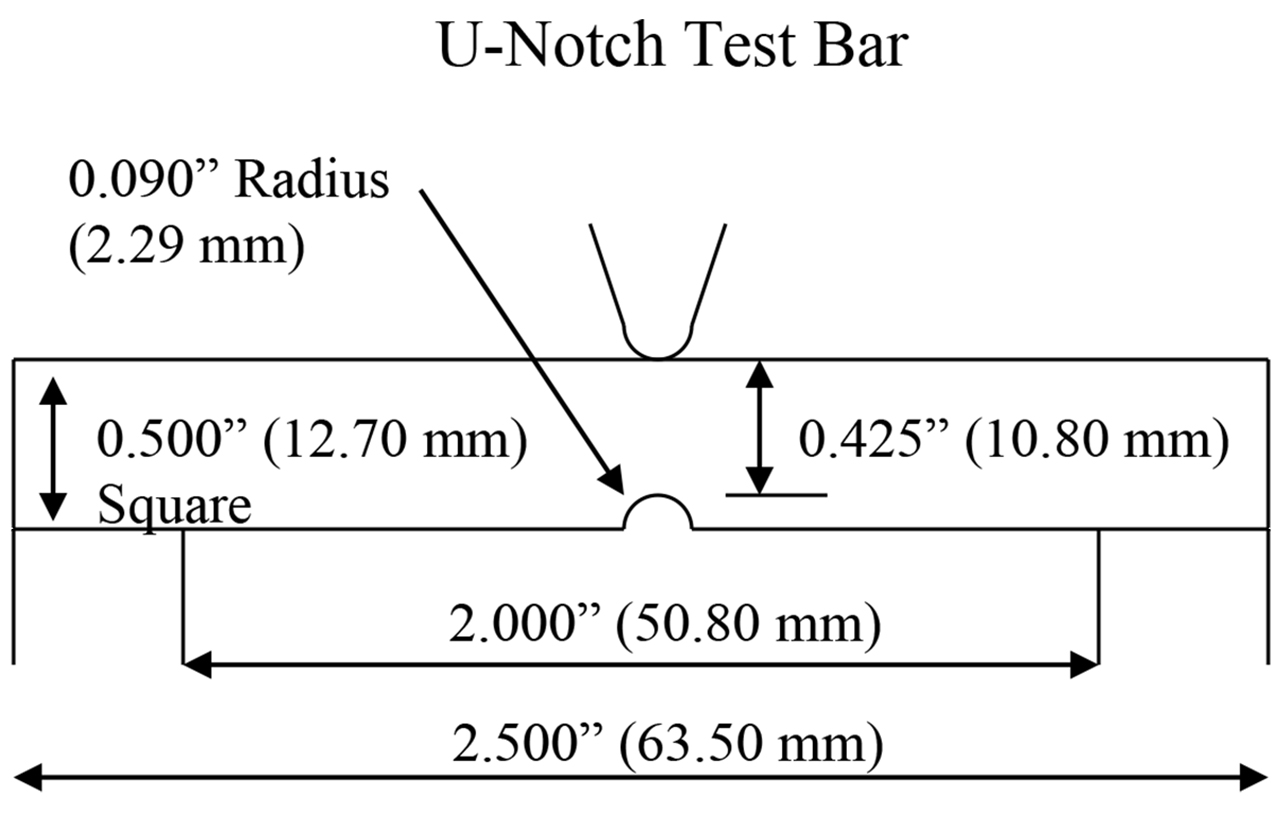
The cross section was designed to duplicate the core hardness on the subject differential gear, and it was approximately the same cross section as the bottom of the actual gear tooth where the fracture occurred. The U-Notch bar could also be readily run on a Charpy tester by making a new set of slightly oversized fixtures.
Carburized steel tests
Figure 2 shows a series of carburized steels tested under slow bend using the U-Notch test bar [1]. Similar to the one-inch diameter shouldered test bar in Part 2, 8615, 8620, and 8625 low nickel steels were used as well as medium nickel 4320 and high nickel 9310. PS55, which is a medium nickel high molybdenum steel, was also evaluated. In addition, carbonitrided 8625 and 4320 with a light case depth were tested as well as 8615 with no temper and an elevated temperature temper. The results appear to be similar to the shouldered bar results.
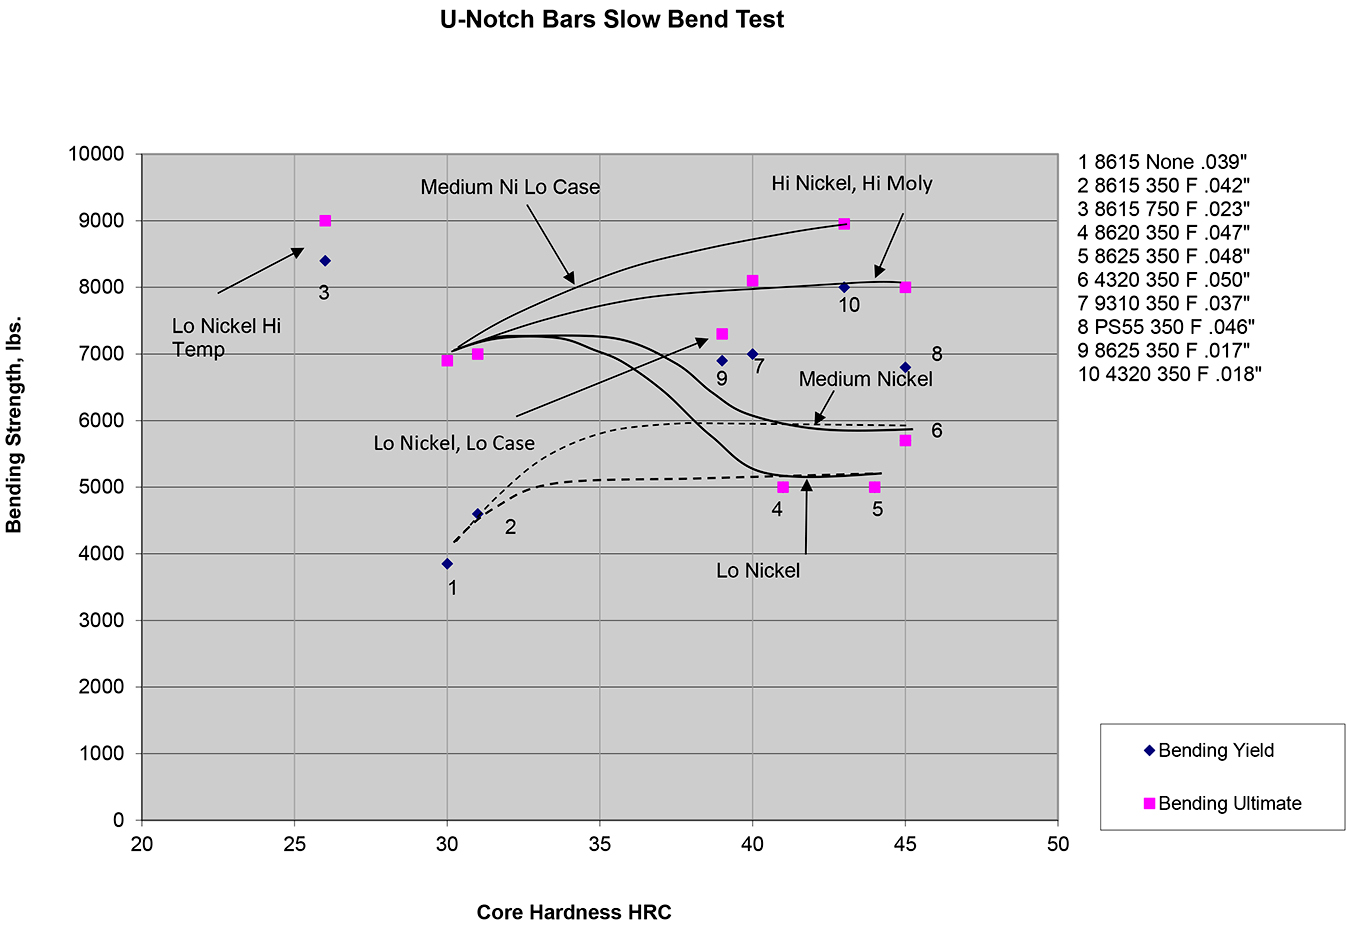
Bending yield (JEL) and ultimate strength initially increase with increasing core hardness. It is typical for the standard depth carburized case to initially crack in the vicinity of or below the yield. This appears as a small blip on the load vs. deflection curve and is audible. The maximum bending yield and ultimate strength of the low nickel steels occurred at 33 HRC, and then the ultimate strength decreased and met the yield at 40 HRC. The medium nickel 4320 steel appears to follow the same trend except the yield is a little higher than with the low nickel steels. The 9310 steel continues to increase in bending strength with increasing core hardness and still maintains a separate yield and ultimate strength. The PS55 steel is similar to the 9310, except the strength level is lower. The light case carbonitrided 8625 and 4320 samples also continue to increase in bending strength beyond 40 HRC and maintain a separate yield and ultimate strength. The highest strength bars were the 4320 light case carbonitrided sample and the 8615 carburized sample tempered at 750°F.
The 8615 carburized sample with a standard 350°F temper had a core hardness of 31 HRC, and the 4320 carburized sample with a temper had a core hardness of 45 HRC. This is similar to the actual gears from the vehicle impact test. The 8615 had a higher bending strength than the 4320. Tempering 8615 carburized steel at 350°F provides only a small increase in bending strength over the untempered condition. Tempering 8615 carburized steel at 750°F provides a very large increase in bending strength.
Quench embrittlement, case depth, and alloy content
This is additional confirmation the carburized case does suffer from quench embrittlement. High core hardness above 40 HRC can be detrimental or beneficial depending on the steel grade and the case depth. A medium nickel steel such as 4320 can provide a modest increase in bending strength over a low nickel steel such as 8620 when the core hardness of both is 40-45 HRC. However, the yield and ultimate will be the same, and the failure will be elastic only. Higher alloy steels such as PS55 and 9310 continue to increase in bending strength as the core hardness increases to 40 HRC and above, and they remain ductile with a separate yield and ultimate. A medium nickel steel such as 4320 with a light case depth can provide bending properties similar to or better than 9310. Since the carburized case suffers from quench embrittlement [2] less case is better for bending strength.
Figure 3 shows the bending strength under impact conditions for the same series of samples used in Figure 2 [3]. An instrumented Charpy tester was used to obtain this data. Figure 3 is actually very similar to Figure 2. The major difference is the U-Notch test bars are stronger in bending under high strain rate impact conditions. In this test, the 4320 carburized sample appears to be slightly stronger in bending compared to the 8615 carburized sample. This is not in agreement with the actual differential gears from the vehicle test.

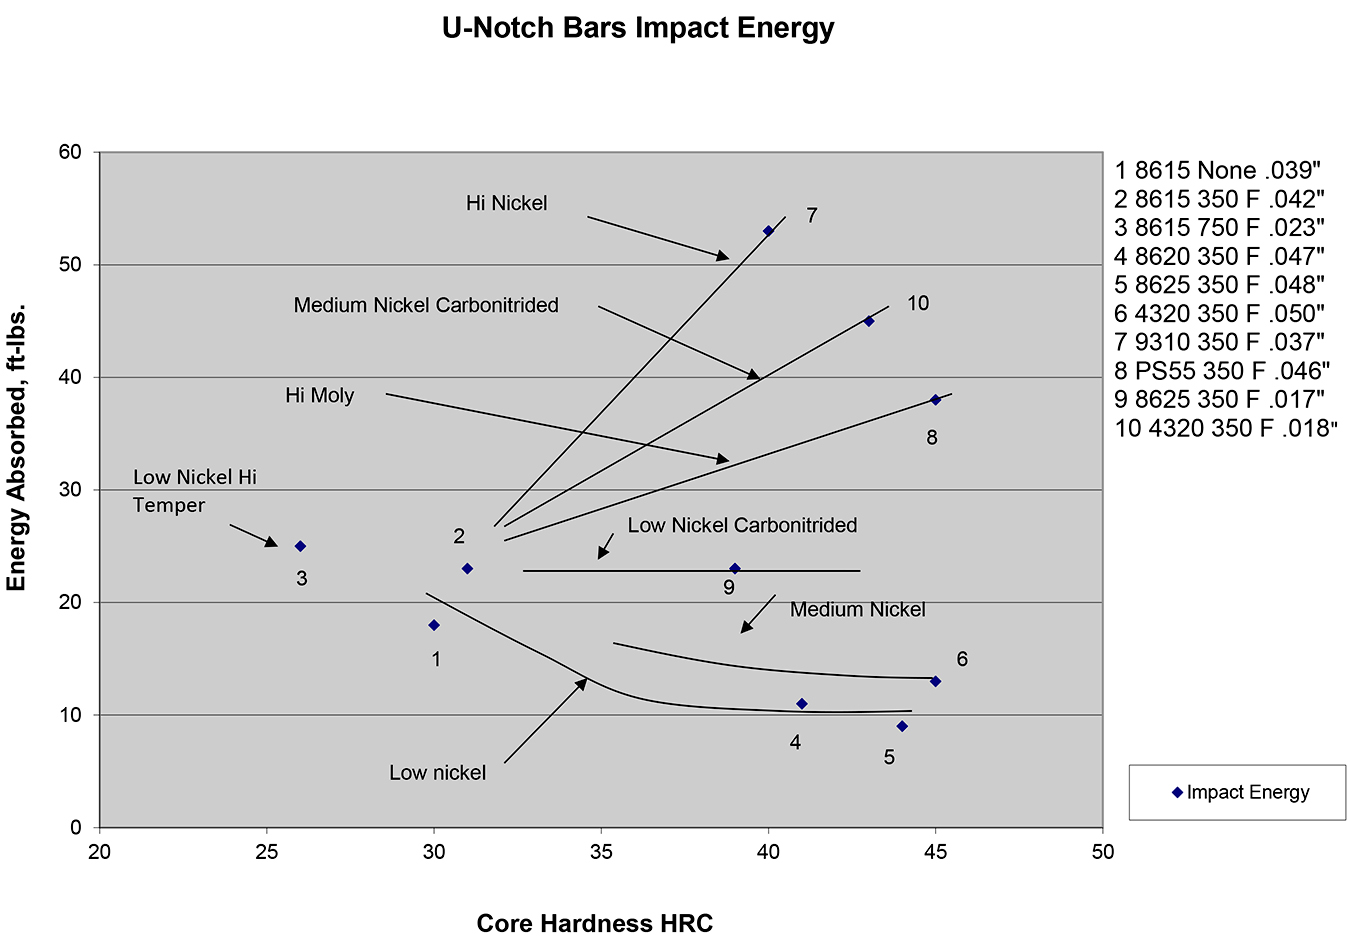
Figure 4 shows the results for the absorbed energy from the impact test [3]. The baseline sample representing the differential gear is sample 2 the 8615 carburized steel with a 350°F temper. The low temperature temper did provide a 27 percent increase in absorbed energy compared to Sample 1 with no temper. In Sample 3, the 8615 with the 750°F temper, which was tied with 9310 for the highest bending strength, provided only a small increase in absorbed energy over the 350°F temper.
In Sample 6, the carburized 4320 sample had about half of the absorbed energy compared to the baseline 8615 sample. This does agree with what we saw with the vehicle impact test. From Figure 4, the best options for increasing the absorbed impact energy of the differential gear would be carbonitrided 4320 or carburized 9310. Carbonitriding was used on these early samples because it was an available process able to produce a light case depth. The ammonia addition is not necessary for alloy steels, and it was eliminated, and there was no difference in mechanical properties or performance. Based on this information, light case carburized 4320 was used to solve the differential gear impact problem. It was the same material previously tested in the vehicle but with a lower case depth.
High cycle and low cycle fatigue
Figure 5 shows the results for the 3-point bending fatigue test [1]. The major changes are all on the left side of the graph in the low cycle regime below 1,000 cycles. This is where the material and heat treatment make the biggest difference. This would include overload, impact, and low cycle fatigue situations.
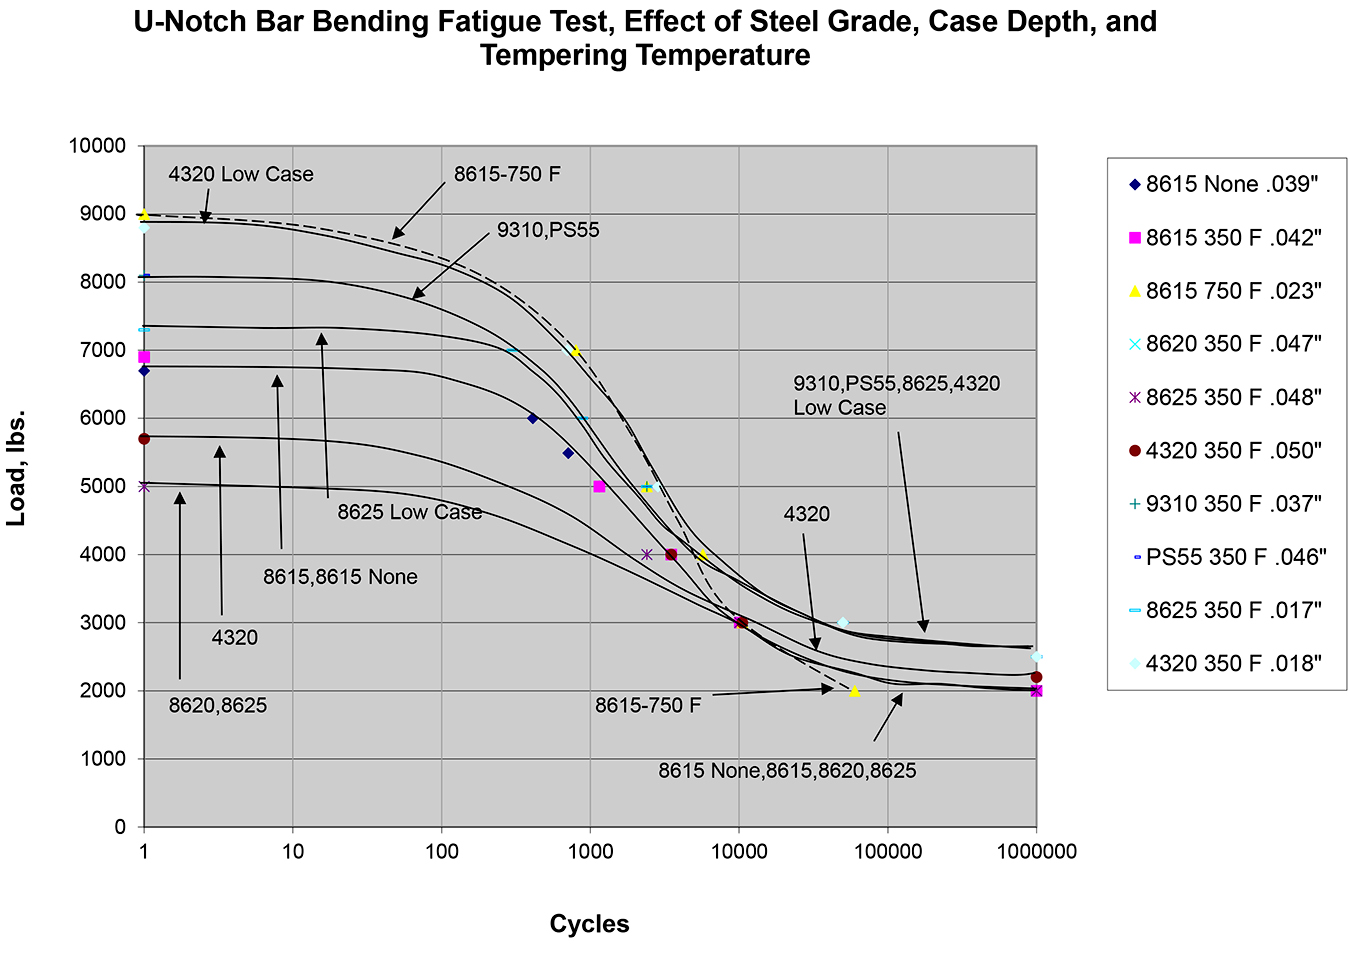
On the right side of the chart, the differences are much more subtle. This would be considered to be high cycle fatigue. In general, what does well on the left side of the chart also does well on the right side. The only exception is the 8615 carburized sample tempered at 750°F. It performs very well in low cycle fatigue but appears to be headed below the other samples in high cycle fatigue. Elimination of the compressive residual stresses is likely an important factor here. The graph does show that carburized 8615 does outperform carburized 4320 in the low cycle area, which is the area of concern with the differential gear. In the high cycle area, that appears to change, and the 4320 has a little higher life.
Figure 6 shows a graph of bending strength vs. case depth for three different steels: 1018, 8615, and 8625 [3). The 1018 steel had a core hardness of 16 HRC; the 8615 steel had a core hardness of 31 HRC, and the 8625 steel had a core hardness of 46 HRC. The case depth is shown as a percent of the 10.8 mm cross section thickness at the bottom of the U-Notch bar radius. The optimum case depth for the 8625 steel is 0.0 percent. This is because the case is actually weaker than the core. Even so, it is not recommended to eliminate the case as this will eliminate the residual compressive stress at the surface, which is important for good fatigue life. The optimum case depth for the 8615 steel is about 1.5 percent, and the optimum case depth for the 1018 steel is about 3.5 percent. As the core hardness decreases, the case becomes stronger than the core and hence more beneficial. Typical light vehicle gear case depths are approximately 6.0 to 12.0 percent of the tooth cross section at the root radius.

Conclusion
Carburized steel behaves differently depending on whether or not a radius or stress concentration is present. The carburized case suffers from quench embrittlement and, as a result, is weaker than the hardness would predict. Case depth, core hardness, and steel composition all play an important role in determining part performance. In general, higher steel alloy content, higher core hardness, and less case depth are all good. It is important to keep in mind that all of this information is valid for bending conditions. A gear tooth also must provide adequate contact strength and life. What is good for bending may be the opposite of what is good for contact and the material and heat treatment may require a compromise. The actual failure mode must be determined before addressing any problems.
References
- G. Fett, “Bending Properties of Carburized Steels,” Advanced Materials and Processes Incorporating Metal Progress, April 1988, Pages 43-45.
- J. Wong, D. Matlock, G. Krauss, “Effects of Induction Tempering on Microstructure, Properties and Fracture of Hardened Carbon Steels,” Proceedings of 43rd Mechanical and Steel Processing Conference, ISS, October 2001.
- Unpublished work done by G. Fett, Circa 1985-1988.


