Tooth-by-tooth induction hardening of gears is a complex process. Variations of any of kind may be sufficient to cause the process to run out of control and produce gears that are out of specification. Since heat treating occurs late in the production cycle, process failure is an expensive proposition. This article highlights some of the most common, and perplexing, problems that we encounter as a company that provides commercial process development, inductor design, fabrication, repair and general process troubleshooting for the industry. Many of the specific examples will be tooth-by-tooth hardening for small DP gears; however, most of this information can be directly applied to other forms of gear hardening.
The induction heat treating process begins with the heat treatment specification. The gear designer determines what case depth is required, where it is required (i.e. root, tip, flank), and what hardness is required (which is also influenced by alloy selection). The requirements may be determined by the initial design criteria, or may be a response to minimize a particular type of failure being experienced in the field. But in general, the hardening pattern specification is developed by the gear engineers.
Hardening encompasses the heating of steel above a critical temperature, then cooling it (quenching) at a rate that causes particular, desired microstructural phases to form in the steel. The mechanical properties strongly correlate to the microstructure. Induction hardening differs from other heat treating processes because the required heat is supplied via magnetic fields induced in the part from an external power source and inductor. This inductor may be referred to by other names including coil, block, intensifier, nest, and occasionally a few well-chosen expletives. Because the magnetic field is limited to the outer surface of the work piece, specific areas of the work piece can be selectively hardened and the resulting shape of the hardened zone can be controlled with the proper choice of power, frequency, time, scan rate and a properly designed inductor.
Several factors that have a profound influence on our ability to achieve a specific heat treat pattern are described below. These include some unexpected variables that can significantly influence the process when induction hardening gears.
Effect of Part Temperature
Gears of all types are generally hardened starting at ambient (room) temperature; however some materials and/or geometries may drive the decision to preheat the gears prior to hardening particularly for large gears. Preheating provides two functions. First, it can help reduce the thermal shock that can lead to cracking. Secondly, it can produce a deeper case than can be achieved when starting from ambient temperature. While preheating is an obvious benefit for some situations, it can be a rogue process variation for others. For example, a large gear requiring low frequency deep case hardness coupled with a slow scan rate may retain heat as it is scan hardened. The target case depth may overshoot due to this elevated part temperature. Furthermore, maintaining a stable preheat temperature throughout the mass may be difficult.
Figure 1 illustrates the impact of preheating a good hardenability steel to 350°F and then induction scan hardening. All other process parameters were held constant. A horizontal line is scribed on the photo at 7 mm depth. As can be seen, preheating produced a deeper case.

Effect of Quenching, Quench Head Position and Back Tempering
Various quench media are used to harden gear teeth, but the following discussions will be referring to commonly used polymer quenches. A specially designed quench delivery system is built and incorporated with the gear inductor to accomplish adequate quenching. Heat migrates across the gear tooth tip during scan hardening for two reasons. First, the induction field couples closely to the sharply pointed edges of the tip. Inductors can be designed to minimize the influence of the geometric coupling, which is an increasing issue with higher frequencies. Second, the heat passes readily through the small land of the tip via thermal conduction. Thermal conduction can be controlled via quenching by using specially designed side quenches integral to the gear inductor.
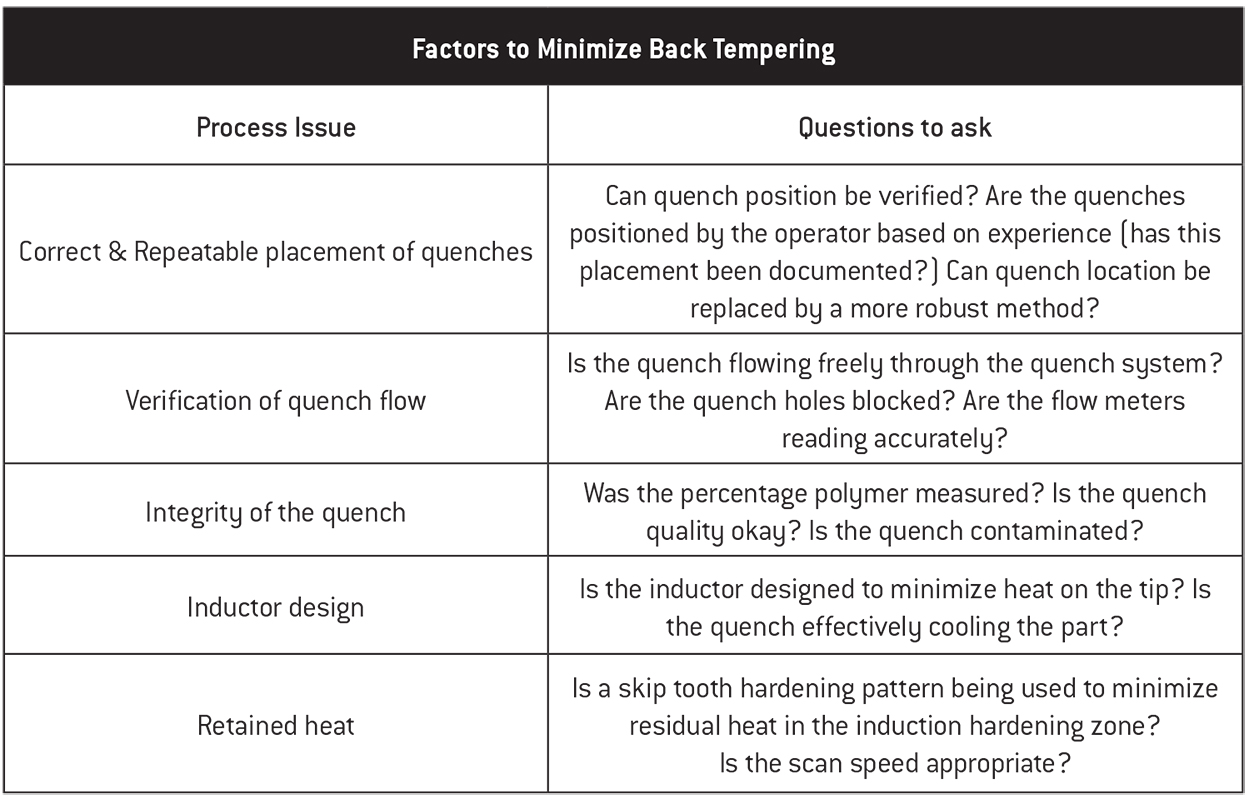
The hardening pattern can be seen by cutting, polishing and etching a gear cross section, a process known as macroetching. Quenching is used to control the hardening pattern, however, the heat from hardening in one tooth space conducts through the tip and tempers back the adjacent tooth spaces that were previously hardened. Back tempering will reduce the hardness on the adjacent tip and this effect may range from a few to over 10 HRC. Some factors to help minimize back tempering are summarized in Table 1.
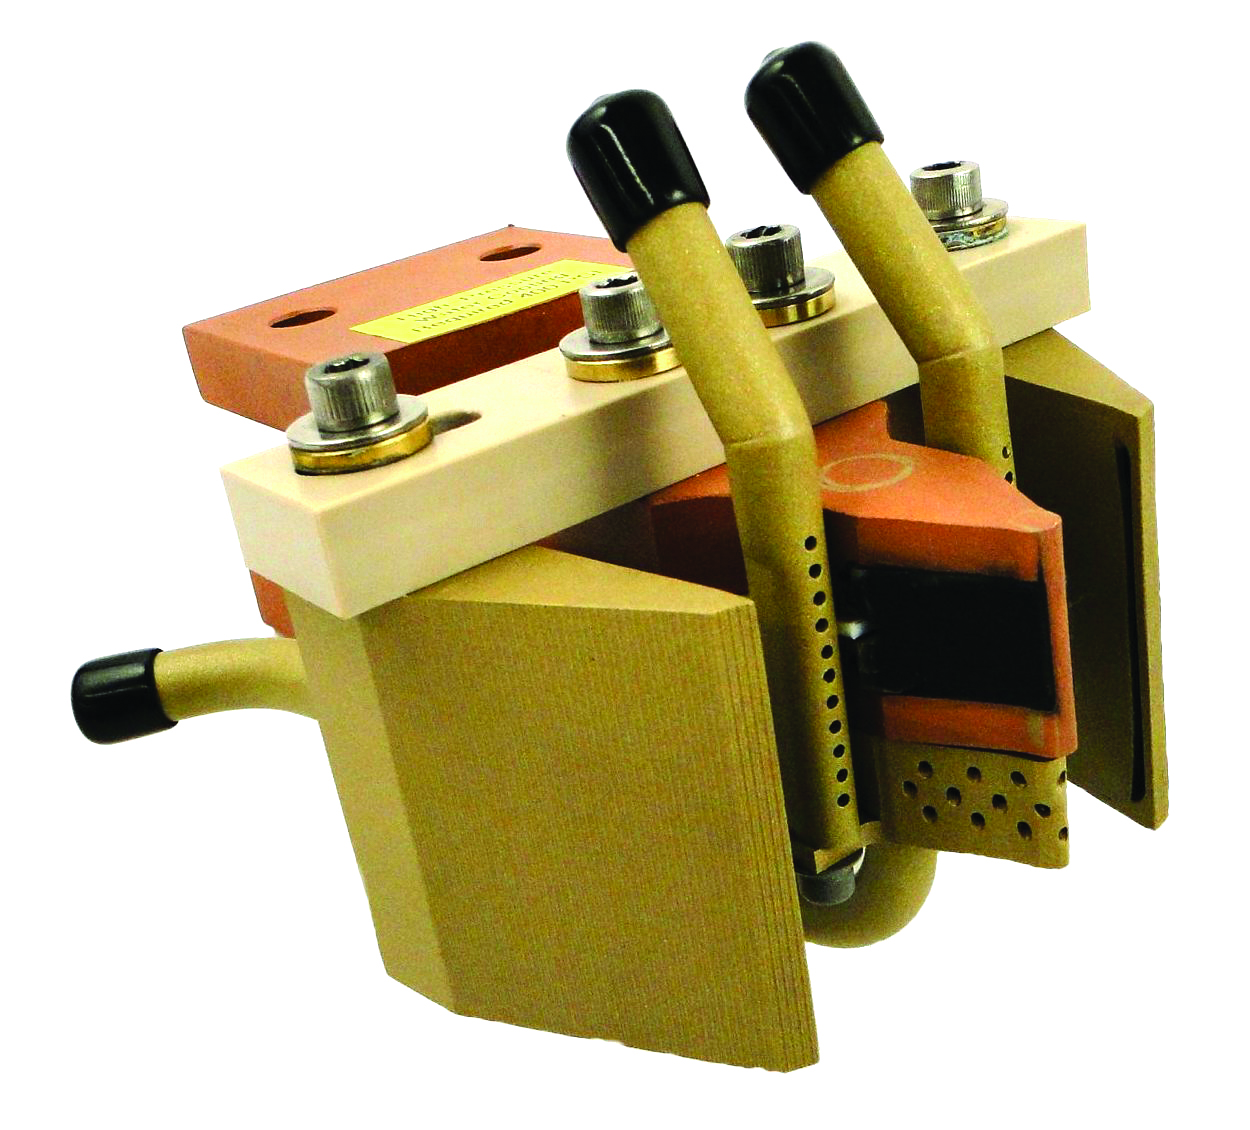
Multiple types of quenches may be required to achieve the desired scan hardening pattern. (Figure 2) The primary quench is usually machined from solid brass to match the gear tooth profile, with internal baffled water passages that provide even quenching along flanks and root areas. Tip quenches are matched pairs of solid machined brass with drilled quench holes, and occasionally narrow slots, to control the heat at the tip and on the adjoining tooth flank. These quenches help prevent tempering back hardness previously hardened teeth. Blade quenches are often required for smaller gear teeth (2.5 DP and smaller) to add additional quench on the adjoining tooth flank to prevent back tempering. Blade quenches are matched pairs of solid machined brass with internal baffled water passages that provide a “blade” of quench cooling that can be positioned where required. It is critical to locate and lock the position of these quenches for repeatable results. We regularly see installations where bent copper tubing and/or plastic snap fittings are used to control the back temper. At best, this should be considered an uncontrolled process that is highly subjective and operator dependent.
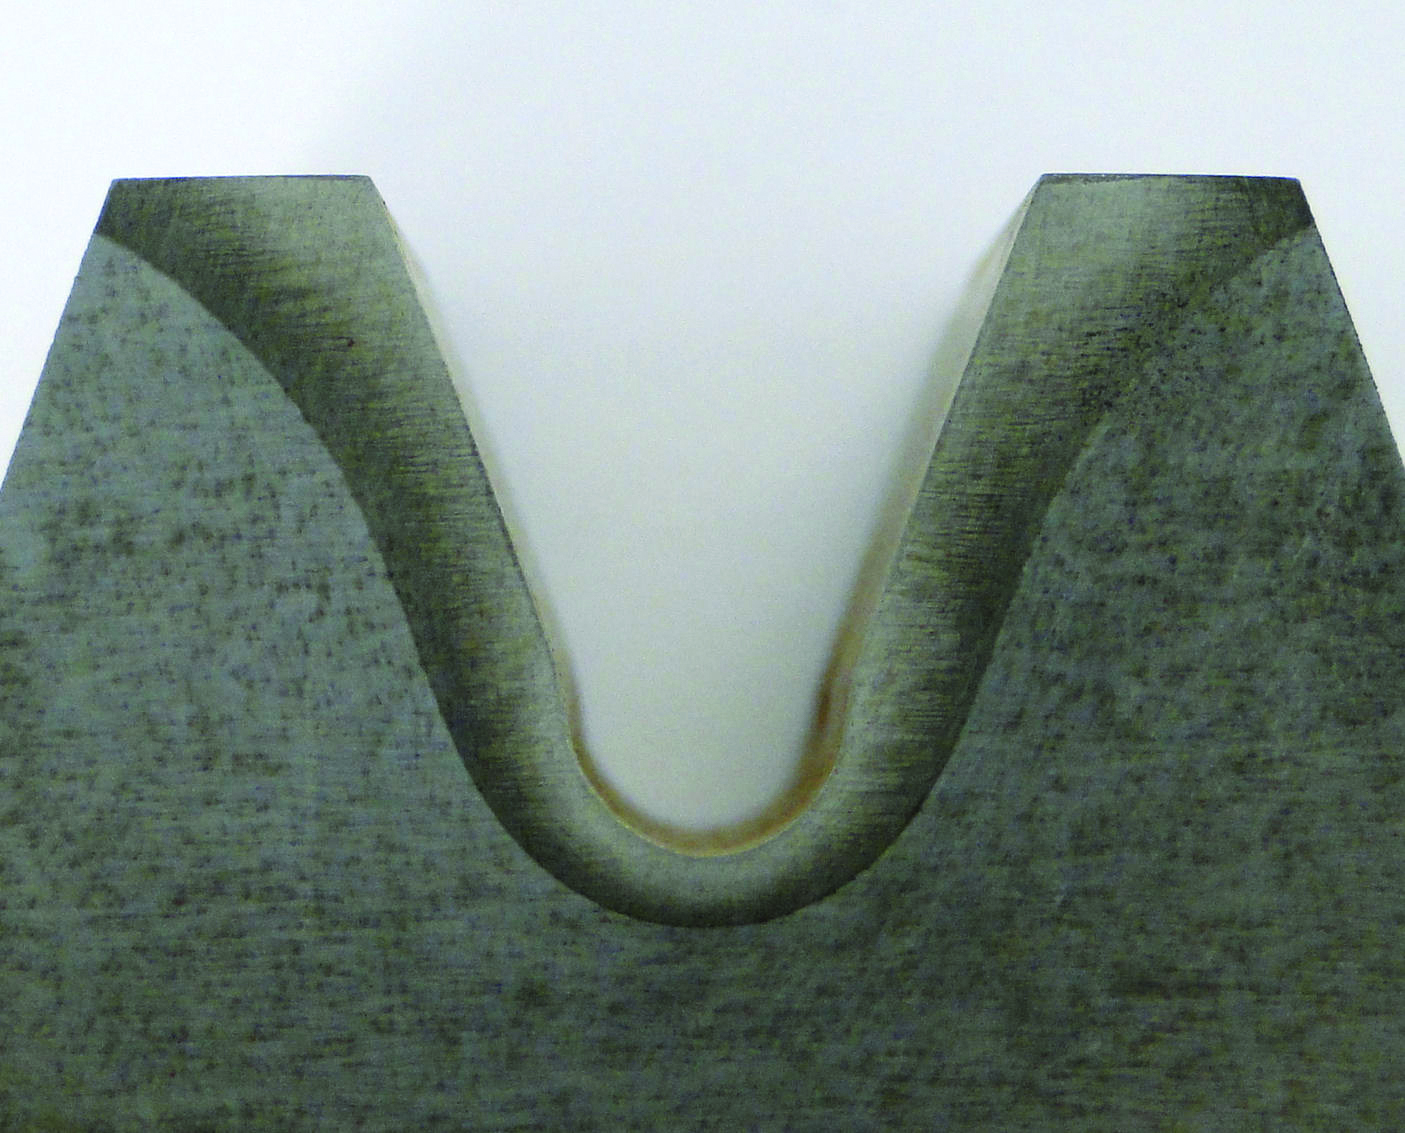
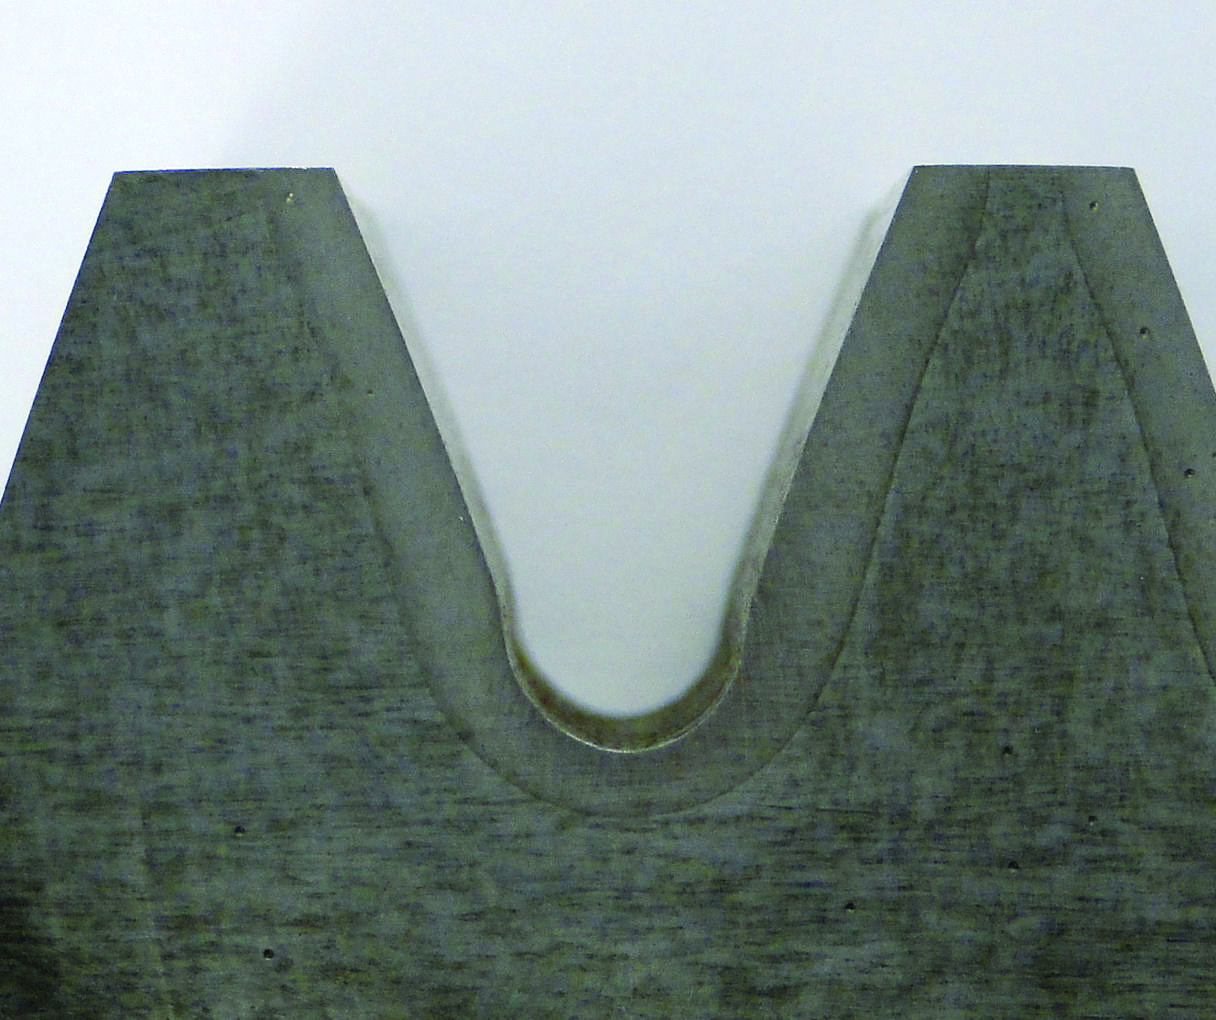
Figure 3a and Figure 3b illustrate the effect of quenches on a small DP tooth space. Figure 3a shows the mass heating pattern produced by the inductor alone without any quenching. A mass quench pattern provides an idea of the inductor capability. Quenching controls hardness as well as the thermal migration through the tooth tip (Figure 3b).
Effect of Inductor Alignment
Whether the operator uses pin gages or an automated “touch-touch” system to locate the inductor to the correct gap, presentation of the inductor to the part is a critical parameter. Not only is the alignment within the gap critical, we have seen many examples where the inductor is not dead center in the tooth space. The result is an offset pattern with deeper case on one side. The inductor may be presented straight into a tooth space, however the tooth space itself may be at a slight angle due to the relationship of the equipment and work piece such as curvature of the gear. This condition can also develop because of difficulty visually aligning the inductor/gear orientation due to physical constraints in the operation. Misalignment creates a difference in case depth side-to-side and may result in hardness variations due to a shift in the quench position. Alignment is important for all gear tooth sizes.
Impact of Inductor Design for Small DP/Mod Gears
When a gear requires:
- tight compliance to case depth minimum and maximum values;
- case depths near the maximum capability of the material;
- tightly controlled run out requirements; or
- is processed on equipment near the limits of its capability,
a careful inductor design may be the most critical influence on successful and repeatable hardening results. An accurate design requires exact detail about each gear tooth based upon the actual profile presented at the time of heat treat. This profile usually includes grinding stock and can be different from the finished print. It is highly recommended and sometimes required that a mold of the gear tooth profile is made before the inductor is designed. It is important to make the mold properly, using a memory silicone material like Plastique® or Plaster of Paris. The surface of the gear must be cleaned with a non-oily solvent and treated with a mold release spray. When making a mold, it is important to push the material tightly into the root removing any air pockets. It is also critical to overlap the top of the part, which will enable the mold to retain its shape and the relationship between the adjoining teeth. Silicone will be flexible when removed; however, Plaster of Paris will shrink slightly and bind to the gear; removal is easy with a rubber mallet. The mold will be used to create a CAD drawing of the actual gear tooth profile for use in the inductor design. Exact dimensions are critical, since the gap between the inductor and gear surface may be as close as 1 mm.
Improving Inductor Life
A robust, bullet-proof inductor is the ultimate goal. Recent advancements in technology have allowed fabrication of advanced, robust designs that provide superior performance and increased inductor longevity. Our designs are created in both 2D and 3D CAD software with detailed engineering drawings which provide high quality, consistent and repeatable manufacturing. Our 5-Axis CNC machines produce solid machined water-cooled copper inductors; thereby eliminating many of the braze joints that can be potential points of failure. A wire EDM is capable of producing cooling passages in complex inductor shapes which have been proven to increase inductor life. Furthermore, a fundamental understanding of when and where to use Silicon Steel Laminations and soft magnetic composites like Fluxtrol® is necessary to enhance induction hardening efficiency. A systematic approach to improving inductor life is sometimes accomplished by analyzing the mode of failure and making corrective changes.
Nuts, Bolts and Fitting Failures
Only non-magnetic stainless steel fasteners and brass or plastic fittings should be used in and around the induction process. Carbon steel bolts and fittings can heat up or melt if exposed to stray induction fields. A prudent approach to avoid an expensive inductor failure is to simply pass a hand held magnet over the bolts and fittings to check for anything magnetic. Every operator should have one. Recently, we have encountered several cases of imported fittings that appear to be brass; however were actually anodized carbon steel.
Inductor Cooling Water Complications
Water cooling is the lifeblood of the induction system. High-production, high-power single shot and scanning inductors need efficient cooling for a long life. A good pump and a clean cold water supply together with a precise inductor cooling chamber design will promote gear inductor longevity. Often inductors are connected directly to the same water system that cools the power supply and work head. Unfortunately, this water supply is at the end of a cooling manifold servicing many internal components, and modern power supplies usually require deionized, distilled or reverse osmosis (RO) water supplies for cooling, sometimes containing a cooling additive. The power supply/work station cooling temperature is specified to be above the local dew point and sometimes set as high as 90°F/32°C to prevent condensation within the unit. The gear inductor does not need to maintain a low dew point since it is usually drenched in quench fluid. However, for a gear inductor prone to cooling failure, this temperature is too high and the supply pressure is too low. In addition, a deionized distilled water system is not necessary to cool the inductor. A good fix is a dedicated cooling supply, injecting pressurized cold (70°F/21ºC or lower) filtered water from a separate source, directly to the inductor. Consider a properly sized, pressure boost pump at 250 psig/17 bar which is available from several sources including a quality inductor manufacturing company.
Absence of cooling (no water) happens more often that one would expect. In high power applications, with no water-cooling, the inductor immediately fails with melted copper and blown braze joints. If the water system was not turned on, a flow monitor in the inductor cooling line might have prevented this failure. For inductors with small cooling passages, a flow monitor may not be sufficiently sensitive to prevent failure. A pressure monitor does not guarantee flow; therefore a visual flow indicator is useful to prevent gear inductor failures. All cooling water to the inductor should be filtered. If the water was turned on but contaminates created an obstruction, the flow may not be sufficient. For most gear inductors we recommend a 25 micron cartridge filter before the inductor inlet and a 100 micron filter for small gear inductors with tiny cooling passages.
Importance of Inductor Maintenance
Gear inductors wear over time and can be damaged from accidental contact with the gear surface. It is important for the machine operator to watch for signs of wear or contamination on the surface of the inductor. Flux intensifiers will degrade over time. If the flux intensifier becomes damaged or missing, the induction hardness pattern can be significantly affected. The machine operator should check the condition of the inductor at regular intervals. In most cases, gear inductors can be rebuilt to like new condition. A typical rebuild can take several days to complete and consists of replacing the water-cooled copper nose, fixing leaks, and replacing flux intensifiers and insulators. All components are cleaned, and contacts are silver-plated. The assembly is pressure-checked water tight and dimensionally inspected. All quench passages are cleaned of any obstructions and checked for proper flow and function. Spare inductors are recommended for high volume gear production to prevent down time during an inductor rebuild period.
Preventing Arcing
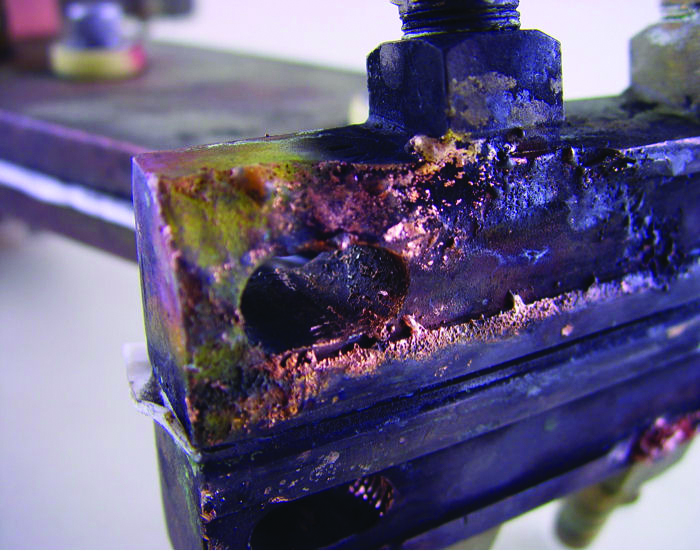
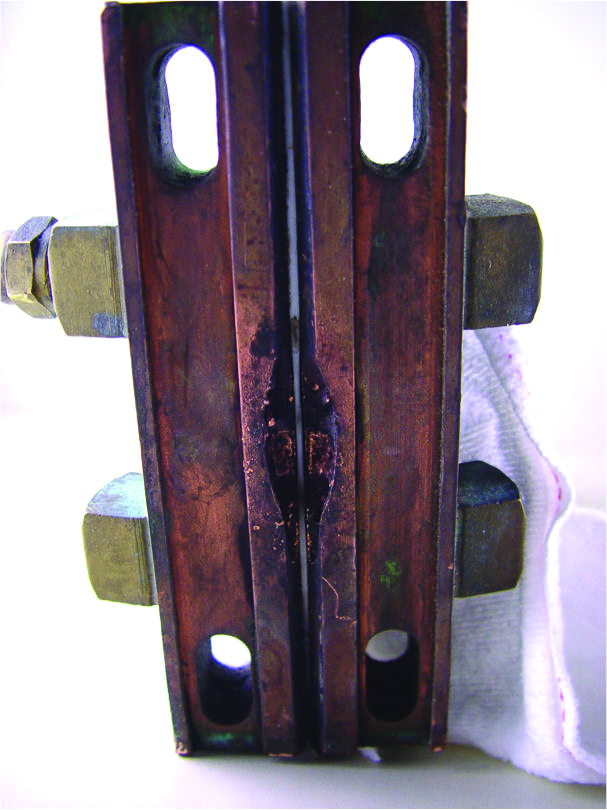
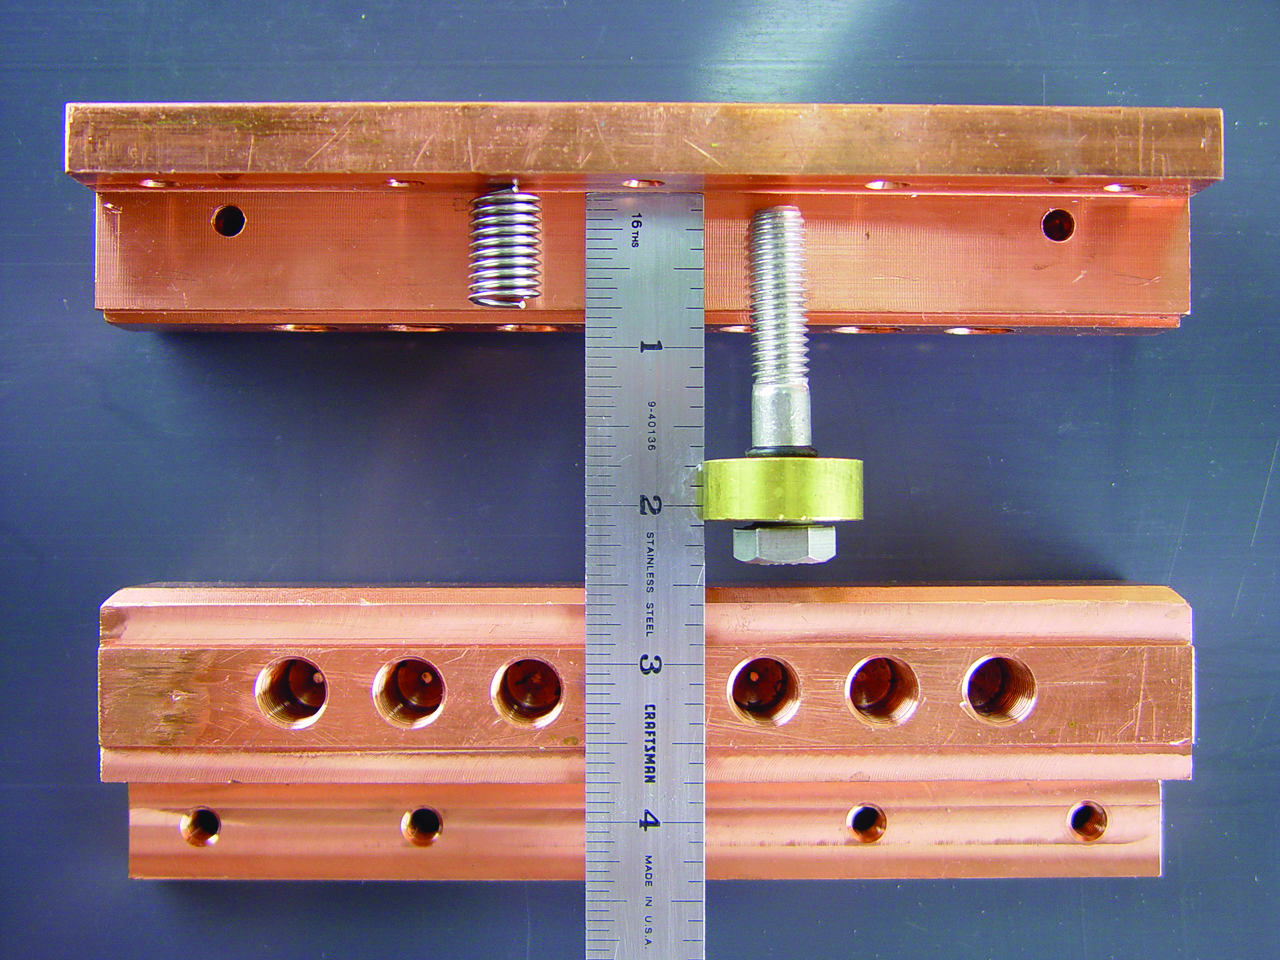
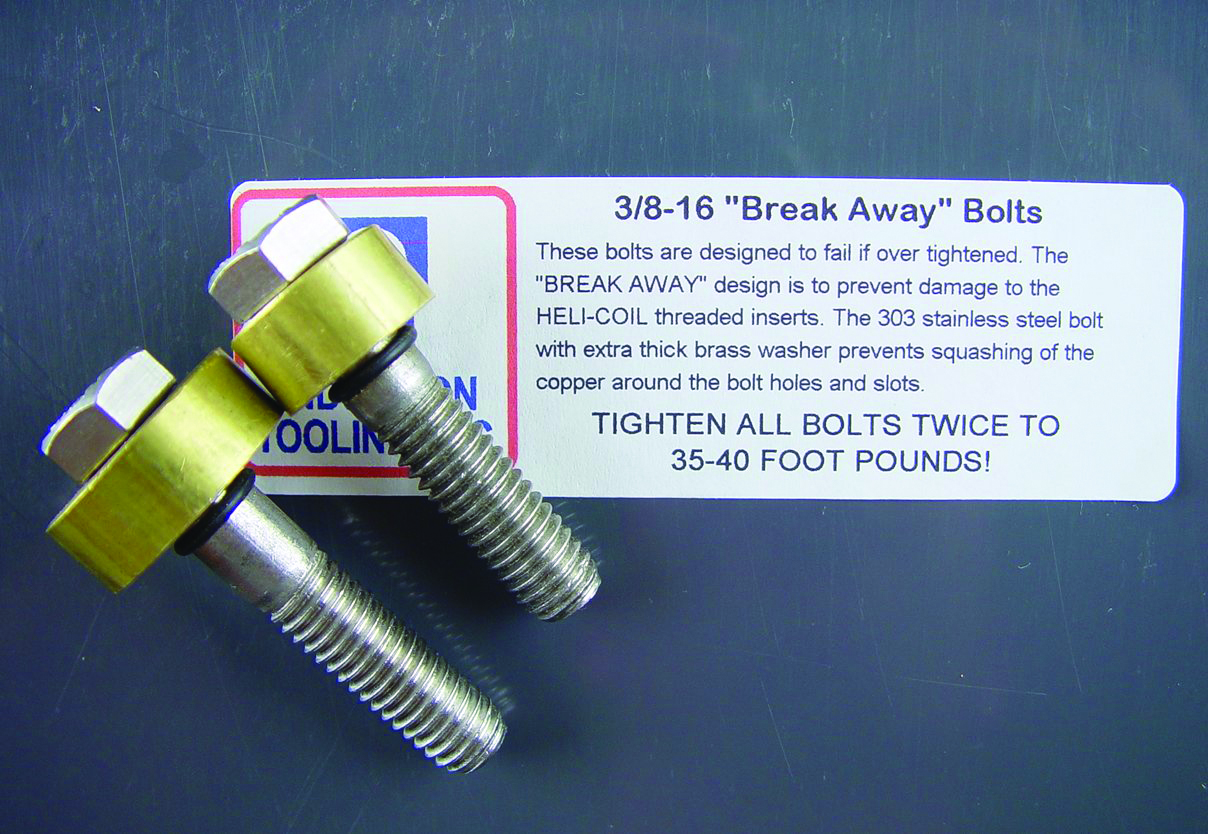
The output transformer is the initial point of electrical contact in the system and this is where power is connected to the gear inductor. Often, the inductor is bolted directly to the transformer. Sometimes bus extensions and inductor adapters are used, which involve several additional points of electrical contact. Each of these contacts must be kept clean and properly bolted or clamped to prevent damage to the contact area. Figure 4a is an example of what can happen to an improperly bolted contact and from arcing caused by a damaged insulator occurred across dirt accumulated over time. The resultant arcing caused extensive damage not only to the contact, but also to the transformer mounting foot, requiring replacement of the transformer. Figure 4b shows well-maintained inductor contacts and appropriate mounting bolts.
Properly bolted contacts require the use of both a proper bolt and washer. As part of preventative maintenance, the threaded inserts in the inductor foot should be inspected for damage before installation to the transformer. Tapped holes in the transformer foot are often blind holes; therefore the threaded hole depth should be measured with a depth gage, or more conveniently, with a pencil point. Using this measurement, the bolt must be shorter than the sum of the contact thickness and the total hole depth. The bolt must fully engage the threaded insert usually 3/8 to ½ inch (approx. 10 to 12 mm) and tightened to 155 or 178 N. Because over-tightening can cause damage to the threaded insert, special breakaway bolts are available (Figure 4b). Made from 300 series stainless steel, they are designed to snap off at the head at a 245 N torque; thereby preventing costly damage to the transformer thread. Since copper crushes easily, special thick washers work with the bolt to protect the copper. Electrical contact maintenance is further achieved by relocating the power transformer away from quench fluids, oil, smoke and dirt. A specially designed bus interconnect is then used to make the connection to the gear inductor. Most of our suggestions can be easily incorporated into a good preventative maintenance program to help prevent arcing failures.
 Quench Maintenance Headaches
If the inductor is the brain of the induction heating system and water is the lifeblood; then the quench system is the heart. Just like a human heart, it is important to keep the quench well maintained and clean of any debris and buildup. Often neglected, sometimes due to budget constraints, the quench system can become polluted, foul smelling, and ineffective. A well-maintained filter system helps, but polymer quenchants do break down over time and the quench system must be drained and cleaned. Before refilling the quench tanks, filter housings and plumbing should be pressure washed to remove scale and scum. While this maintenance is expensive, it is absolutely necessary to produce robust process.
It is equally important to remove any metallic debris from the quench. Metallic debris comes with the part being processed in the form of turnings, foundry and grinding dust. They are deposited into the quench fluid by repeated quenching of the gears. Some of these particles can be very fine (about the consistency of copy toner) and can pass through a bag filter. If not removed, these electromagnetically accumulate on the surface of the inductor and cling to the walls of the quench system. Trouble begins with arcing at the gear inductor and components. A magnetic particle separator or a bar magnet in the bag filter are both good methods to address this issue. At the very least, a rubber coated strong permanent magnet can be installed on a hangar off of the tank bottom near the return.
Conclusion
Tooth-by-tooth gear hardening is one of the most complex induction hardening processes. Any number of relatively minor variations can force the hardening process out of specification. Proper operator training, adequate maintenance and a fundamental understanding of the hardening process are all part of the equation. For induction hardening of gears, the devil is in the details.
References
- Induction Tooling Inc., Internal research reports.
- ASM Handbook Volume 9: Metallography and Microstructures, ASM International, 2004.
- Haimbaugh, R.E., Practical Induction Heat Treating, ASM International, 2001.
- ASM Handbook, Volume 4C: Induction Heat Treating, ASM International, publication expected in 2014.


