The Jominy end quench test [1][2] (ASTM A255 [3]) is an extremely simple and useful test that is applicable to many materials besides steel [4][5]. This test can provide basic information on the hardenability of a material and be used for specifying incoming material for heat treatment. It can also be used to predict the expected hardness of an as-quenched heat-treated part [6] as well as specifying materials during initial product design [7].
The Jominy end quench test consists of a simple bar 25 mm in diameter by 100 mm long. A small flange is machined at the end of the specimen for support. The bar is heat treated at normal austenitizing temperatures for the specific alloy for approximately one hour. The specimen is removed from the furnace, and hung in a special fixture (Figure 1).

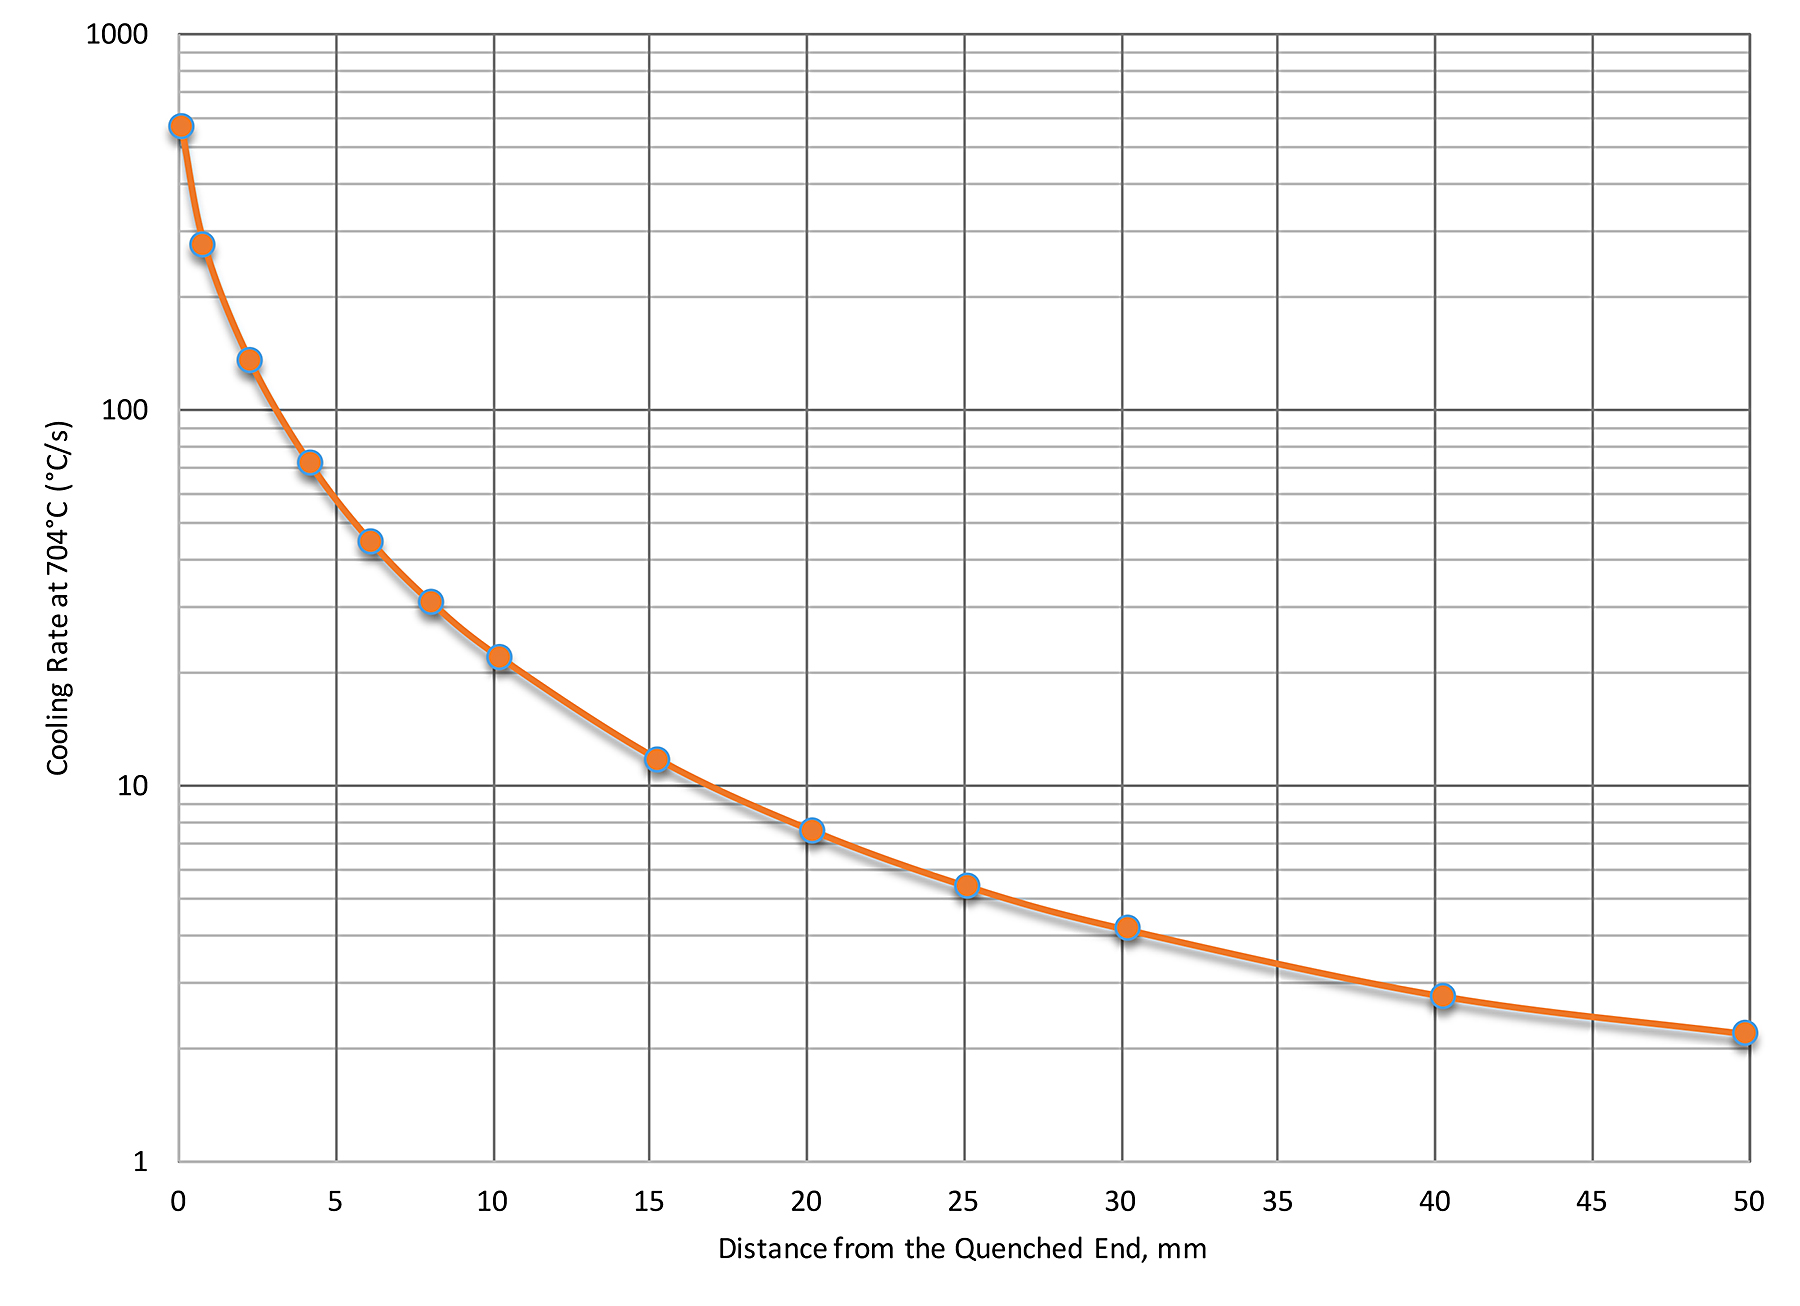
As soon as the specimen has been hung in the fixture, a water valve is turned on, allowing water to cool the bottom of the specimen (the quenched end). A gradient of quench rates occurs along the length of the sample, with the quenched end exhibiting the highest quench rate and distances away from the quenched end showing progressively slower quench rates (Figure 2).

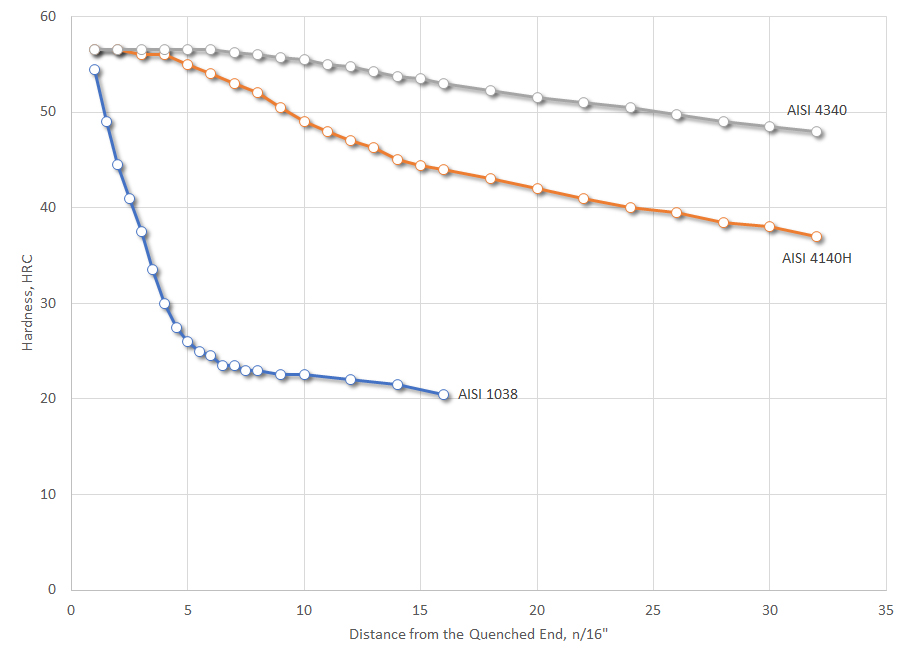
Once the specimen has cooled, two flats the length of the specimen are machined on opposite sides of the bar. Harness measurements are taken at either 1mm- or 1/16-inch intervals along the length of the bar, starting from the quenched end. This data is then plotted as a function of distance from the quenched end. An example of the Jominy end quench plots for several alloys is shown in Figure 3.

In Figure 3, it can be observed that, at identical quench rates (or distance from the quenched end of the Jominy end quench specimen), the hardness of each of the alloys is different. This very clearly shows the differences in hardenability of the different alloys.
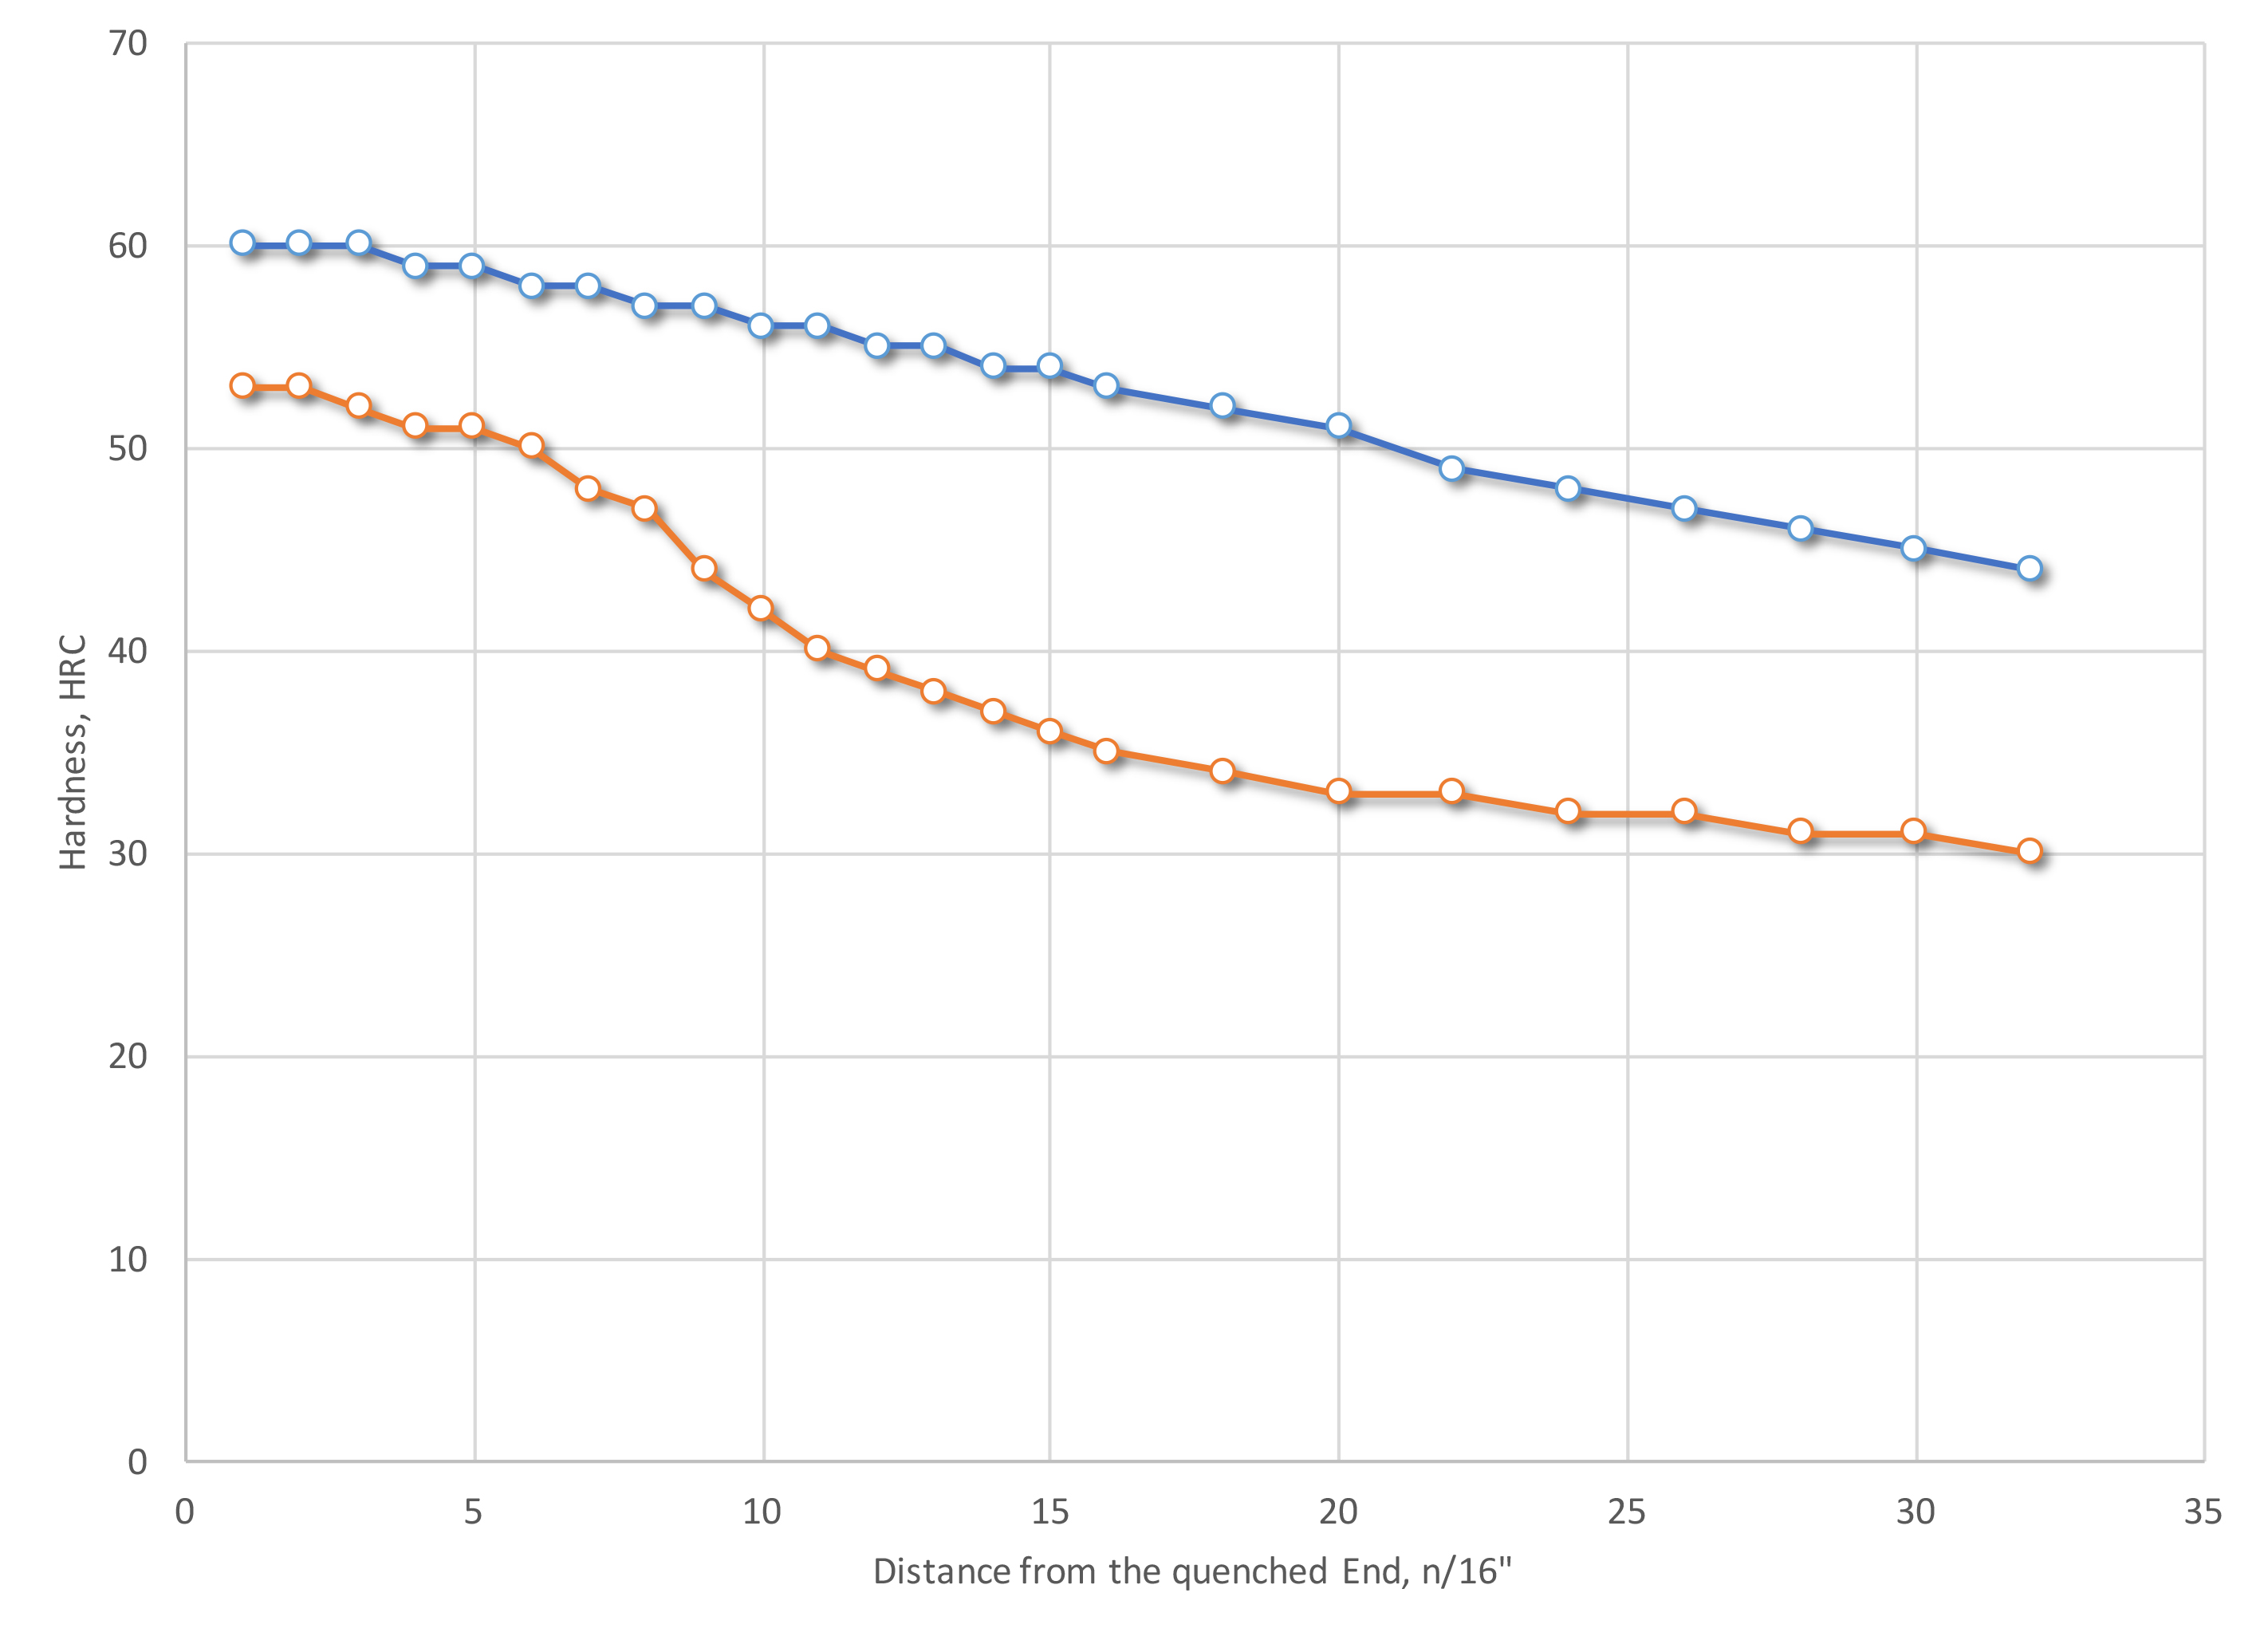
There will be a range of Jominy data depending on the chemistry of the alloy. This is illustrated in Figure 4.

This data can be useful for determining the minimum hardenability needed for parts. To determine this, it would be necessary to consult the Lamont [8] charts. In these charts, the hardness of round bars of different thickness is correlated to the Jominy end quench data (Figure 5). For instance, if the needed as-quenched hardness at the center of a 2.0” diameter bar is needed to be HRC 50, and the quench media is a fast quench oil (H = 0.7), then the incoming material would be specified as requiring a hardness of HRC 50 at J8. One of the drawbacks of this is the value of the Grossman H-value [9]. Often it is not known. However, it usually can be determined from cooling curve data or from your oil supplier. This will be the subject of another article.

Assuming that the Grossman H-Value is known either from calculation or from the quenchant supplier, this data can be used to predict the expected hardness, or to select an alloy to be used for a possible part. For instance, say the part is 2 inches in diameter and is quenched in water (H= 1.0). From Figure 5, the surface hardness would correspond to J4, and the center hardness would correspond to J9. A tabulation of Jominy end quench data would be examined [10], and an alloy would be chosen that satisfies the required surface and center hardnesses at those distances from the quenched end.
In the same fashion, after a material has been chosen, the data can also be used to select a quenchant to be used to achieve the desired surface and core properties. This is useful to ensure that, once the part has been designed, it can be manufactured and not be prone to cracking or distortion.
Conclusion
In this short article, the Jominy end quench test has been described. The method of conducting the test has been briefly discussed. The practical application of the data provided in the Jominy end quench test to specifying minimum hardenability requirements for incoming material for heat-treated parts was illustrated using Lamont charts. The selection of material for a part, based on the center and surface hardness, and a typical quenchant were also illustrated.
In summary, the Jominy end quench test is a powerful and data-rich test method that can be used by heat treaters, quality engineers, and designers to ensure that a part is made to specification.
Should there be any questions on this, or if you have suggestions for topics to be discussed, please contact the editor or myself.
References
- J. E. Jominy, “Standardization of Hardenability Tests,” Metals Progress, vol. 40, pp. 911-914, December 1941.
- W. E. Jominy, Hardenability of Alloy Steels, Cleveland: American Society for Metals, 1939.
- ASTM, “Standard Test Methods for Determining Hardenability of Steel,” ASTM International, West Conshocken, PA.
- D. S. MacKenzie, Quench Rate and Aging effects in Al-Zn-Mg-Cu Aluminum Alloys, Rolla, MO: University of Missouri – Rolla, 2000.
- J. W. Newkirk and D. S. MacKenzie, “The Jominy End Quench for light-weight alloy development,” Journal of Mat. Eng. Perf., vol. 9, no. 4, pp. 408-415, August 2000.
- M. Asimov, W. F. Craig and M. A. Grossman, “Correlation between Jominy Test and Quenched Rounds,” SAE Trans., vol. 49, no. 1, pp. 283-292, 1941.
- F. J. Otto and D. H. Herring, “Gear Heat Treatment,” Heat Treating Progress, no. June, pp. 1-5, 2002.
- J. L. Lamont, “How to Estimate Hardening Depth in Bars,” Iron Age, no. 10, pp. 64-70, 1943.
- M. A. Grossman, “The Nature of the Quenching Process,” in Elements of Hardenability, Metals Park, OH: American Society for Metals, 1952, pp. 61-91.
- American Society for Metals, Heat Treaters Guide Standard Practice and Procedures for Steel, Metals Park, OH: ASM International, 1982, pp. 423-426.
- Timken, Practical Data for Metallurgists, 17th Edition, North Canton, OH, 2014.


