In the previous article, we discussed the artificial aging of aluminum. Once we have heat treated the parts, we need to verify the properties. While a tensile test can be used, the most frequent method of verifying mechanical properties of heat-treated aluminum is by hardness and conductivity.
Hardness and Conductivity of Aluminum
Conductivity measurements in aluminum are commonly designated as a percentage of IACS (International Annealed Copper Standard) where the conductivity of the measured alloy is compared to the conductivity of unalloyed annealed coper at 20°C (68°F). Pure annealed copper has a conductivity of 100 percent IACS. Alloying elements in solution in aluminum reduce the conductivity. If the alloying elements precipitate or are not in solution in the aluminum, the conductivity will tend to increase. The conductivity of aluminum is determined by the percentage of alloying elements in solid solution and the amount and nature of the precipitates.
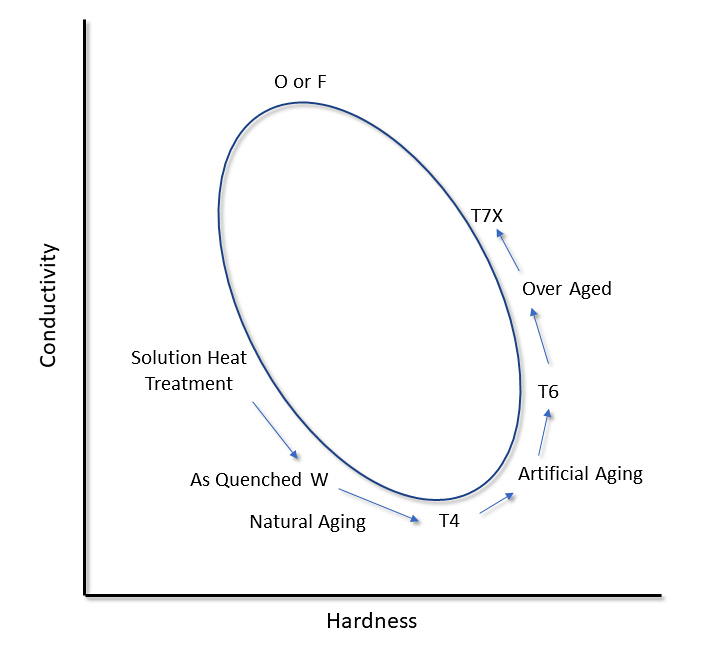
In the as-quenched condition, all alloying elements are in solid-solution. As the alloy is naturally aged, the conductivity will decrease. This is the result of the formation and growth of GP zones. These fine precipitates lead to an increase in the hardness of the alloy. As more fine precipitates form, the hardness increases. This increase is due to strains around the coherent GP zones and precipitates, which hinder dislocation movement [1]. As aging increases, particularly in the peak aged condition, the hardness is at a maximum and conductivity has increased. As the precipitates become incoherent with the matrix, the strains dissipate, and the hardness decreases. Conductivity will increase, as less of the alloying elements is present in solid solution [2]. When a fully annealed condition is obtained, the final equilibrium precipitates are obtained, and most of the alloying elements are present as precipitates. At this point, the conductivity is at a maximum, and the hardness is at a minimum. This results in a hardness and conductivity loop as shown in Figure 1. Therefore, it is important to measure both hardness and conductivity to determine the heat-treated condition of a part. This is illustrated further with actual data from different alloys (Figure 2) [3].


Hardness of a part is measured using a typical Rockwell “B” hardness tester. The surface conductivity of aluminum alloys is typically measured using an eddy-current conductivity meter. Eddy current is a non-destructive testing technique that uses a probe to induce small alternating current within the part that is being examined. Eddy current testing produces a rapid and easily used method of determining the conductivity of a part. A typical eddy current conductivity tester is shown in Figure 3. Reference standards are required to properly calibrate the eddy current meter.

Requirements
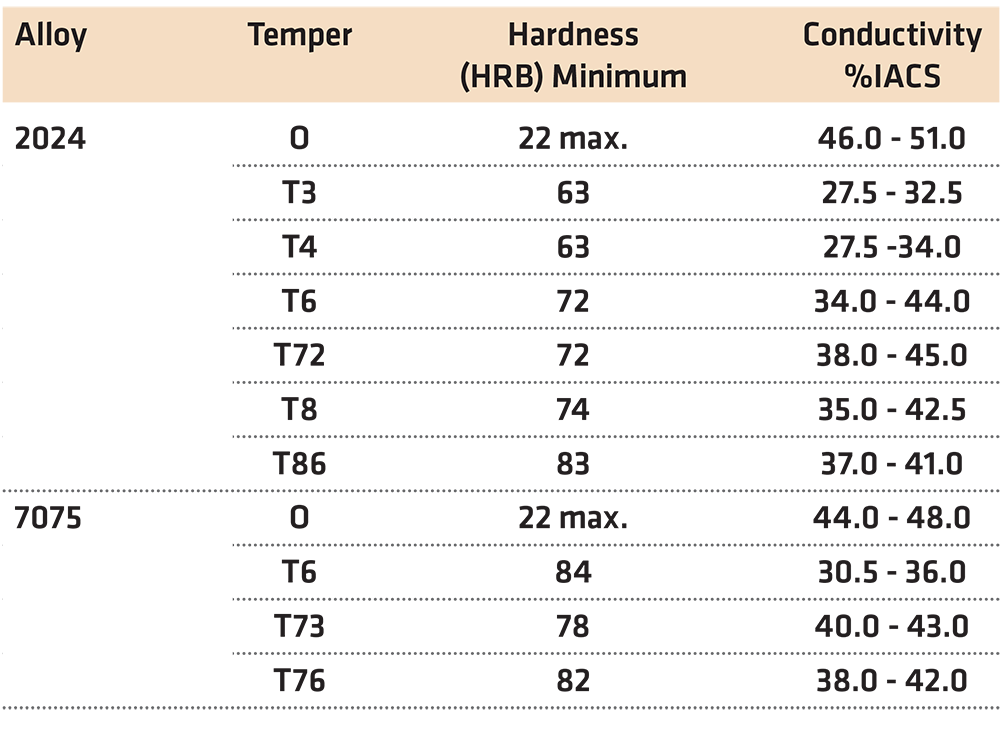
In many instances, the values for the hardness and conductivity of a heat-treated aluminum part are fixed as part of the specification. This is especially true in the aerospace industry where the hardness and conductivity of heat-treated aluminum parts are specified by AMS 2658D “Hardness and Conductivity Inspection of Wrought Aluminum Alloy Parts” [1]. This specification establishes hardness and electrical conductivity acceptance criteria of finished or semi-finished parts of wrought aluminum alloys. Many other industries, such as automotive, are also adopting this standard. Typical values of those required in AMS 2658D are shown in Table 1.

Conclusion
In this short article, the use of hardness and conductivity was discussed to determine the heat-treated condition of an aluminum alloy, or to verify the condition of the alloy after heat treatment. The changes in hardness and conductivity were described as a function of the amount of solid solution present and the strain fields present around the coherent and incoherent precipitates.
It is hoped that you enjoyed this series on the heat treatment of aluminum. I would welcome suggestions for either a new series or suggestions for new columns. If you have any questions or comments about this or any other column, please contact the editor or myself.
References
- D. S. MacKenzie, Quench Rate and Aging effects in Al-Zn-Mg-Cu Aluminum Alloys, Rolla, MO: University of Missouri – Rolla, 2000.
- D. S. MacKenzie, “Quenching of Aluminum Alloys,” in Heat Treating of Nonferrous Alloys, Metals Handbook 4A, vol. 4E, G. E. Totten and D. S. MacKenzie, Eds., Materials Park, OH: ASM International, 2016.
- D. S. MacKenzie, “Metallurgy of Heat Treatable Aluminum Alloys,” in Heat Treating of Nonferrous Alloys, vol. 4E, G. E. Totten and D. S. MacKenzie, Eds., Materials Park, OH: ASM International, 2016, p. Metals Handbook 2A.
- SAE International, “Hardness and Conductivity Inspection of Wrought Aluminum Alloy Parts,” SAE International, Warren, OH, 2016.
- D. S. MacKenzie and G. E. Totten, Eds., Analytical Characterization of Aluminum, Steel, and Superalloys, Boca Raton, FL: CRC Press, 2005.
- D. S. MacKenzie, “Heat Treating Aluminum for Aerospace Applications,” in Proc. 1st ASM Int. Surface Engineering and 13th IFHTSE Congress, Columbus, OH, 07-10 October 2002.


