In its simplest sense, pyrometry is the measurement of temperatures. Practically speaking, in the business of heat treatment, the term also refers to the equipment, standards, and specifications that make it possible to measure temperatures — particularly, the high temperatures required for altering the properties of a part to achieve the desired metallurgical results.
To address these complications, industry leaders have developed a number of systems and guidelines that help lead to consistency and quality. One of the most important such programs is the National Aerospace and Defense Contractors Accreditation Program (NADCAP). NADCAP certification is essential to any business that wants to do heat treating work for the aerospace industry.
To ensure consistency of temperature measurement in heat treating processes, NADCAP relies on a document known as AMS 2750 (AMS = Aerospace Materials Specification). It’s important to note that although NADCAP and AMS are both based in the aerospace sector, the certification and specification apply to the overall heat treatment industry and are not limited to aerospace alone.
AMS 2750 covers all aspects of pyrometry in heat treatment, including:
- Controllers (calibrations, specifications, and readability requirements)
- Thermocouples (calibrations, usage, and types)
- Recording instruments (calibrations and accuracy)
- Accuracy requirements and tolerances for acceptance
- Calibration procedures
- Temperature survey procedures
- Frequency of activities
Temperature Uniformity Surveys
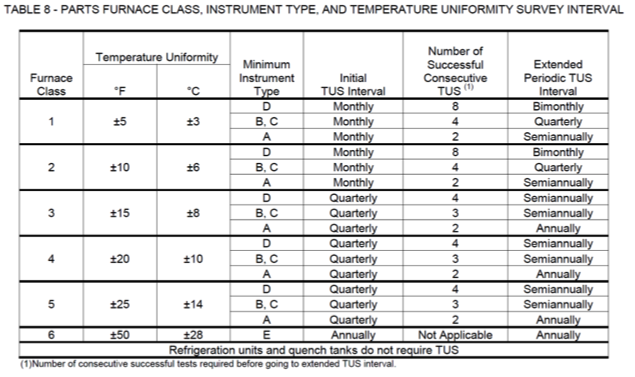
One of the key components to AMS 2750 is the Temperature Uniformity Survey (TUS). A TUS verifies the classification of your furnace and its qualified working zone, and this in turn determines your required ongoing testing schedule in order to maintain conformity with AMS 2750. Furnace classification is a key piece of information that the TUS will use to determine required frequency of testing activities. Furnace class is determined by the temperature uniformity range within the qualified working zone — put simply, in the area of the furnace that you will be using, how close are you staying to your desired temperature. The temperature uniformity range is described as a plus/minus degrees value, as shown in Figure 1. So, for example, if a furnace is meant to run at 1,900°F, and it ranges between 1,887° and 1,913°, it would qualify as Class 3. A higher-rated furnace classification means that the furnace is able to stay closer to its target temperature without variation.

In addition to classification, AMS 2750 also uses instrumentation type to determine a furnace’s mandatory testing schedule. The five instrumentation types (A-E) are defined clearly within the specification.

Put together, furnace classification and instrumentation type clearly determine the testing schedule necessary for your furnace in order to maintain certification. So, for example (see Figure 2), a Class 2 furnace with instrumentation type B is required to undergo a TUS on a monthly basis, whereas a Class 5 furnace with instrumentation type B only requires a quarterly TUS.
However, AMS 2750 rewards success. If a furnace completes a designated number of TUSs successfully, the interval between testing can be increased. In the aforementioned example, if the Class 2 furnace with instrumentation type B were to undergo four consecutive successful TUSs, its required testing would stretch from monthly to quarterly.
Having to perform fewer TUSs is a huge benefit that can lead to:
- Lower cost of labor/materials
- Increased production/reduced downtime
- Decreased time spent on documentation of the process
A TUS requires time and organization, since there are many pre-requisites prior to performing the TUS. Even though a survey may only take two hours to run, it involves planning and coordination to get all the pieces in place. All the while, management and production are probably waiting for that valuable furnace time. To minimize this downtime, streamline the activities that surround the TUS in order to create an efficient process.
For example:
- Organize paperwork.
- Ensure quick and easy access to maintenance logs.
- Have a prefabricated TUS rack wired in advance.
- Communicate dates for calibration of equipment.
- Develop a quick reporting technique for easy review and signoff.
Put together, these preparations can shave hours off the process. When multiplied by a number of furnaces, the financial benefits are clear.
Metallurgy and Temperature Uniformity
There are many aspects of heat treating that can be compromised by temperatures not meeting the targets set forth by design engineers for the part performance, such as retained austenite, case depth, and low hardness.
Retained Austenite
Retained austenite is a function of the austenitizing temperature, alloy content, and quench media. Retained austenite can occur when there is a gross issue with uniformity, combined with a higher-than-intended furnace temperature. As the austenitizing temperature increases, the retained austenite can increase as a result. While most post-quench sub-zero treatments can hide this type of issue, there are many manufacturing processes that are attempting to heat treat steels without a sub-zero treatment to save both time and money. In those processes, the temperature uniformity is even more critical.
Case Depth
Case formation and diffusion into the steel are directly related to temperature. When the actual temperature inside the furnace is even slightly higher or lower than uniformity requirements allow, the case depth of longer processes can be significantly affected.

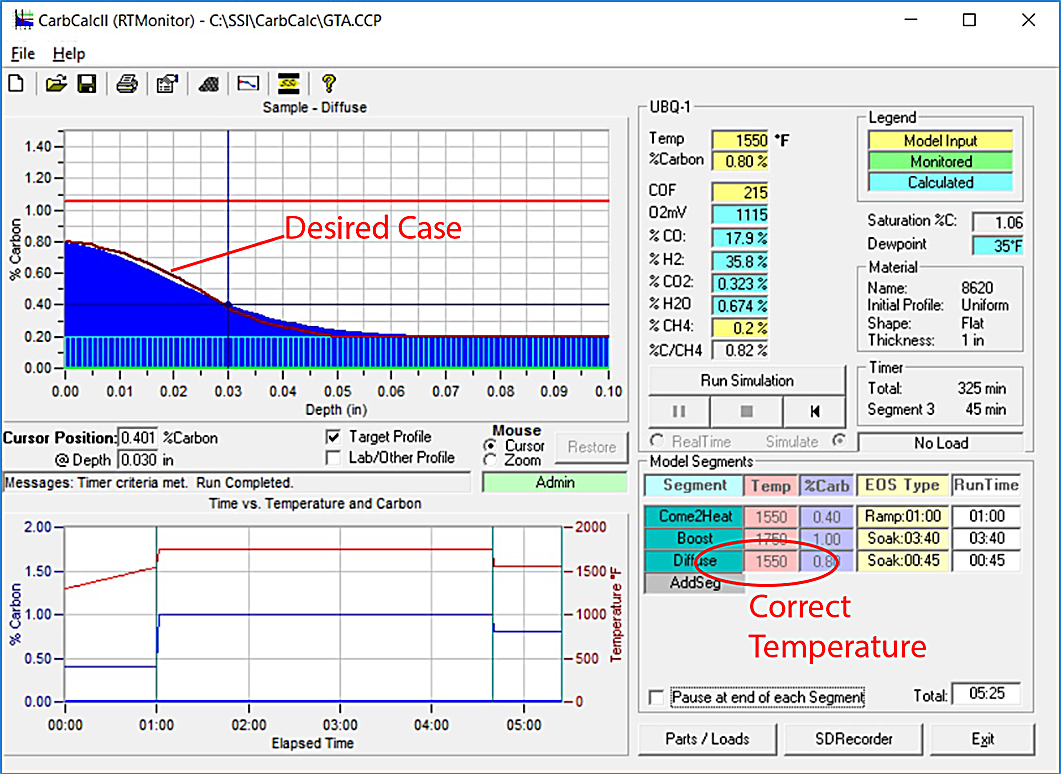
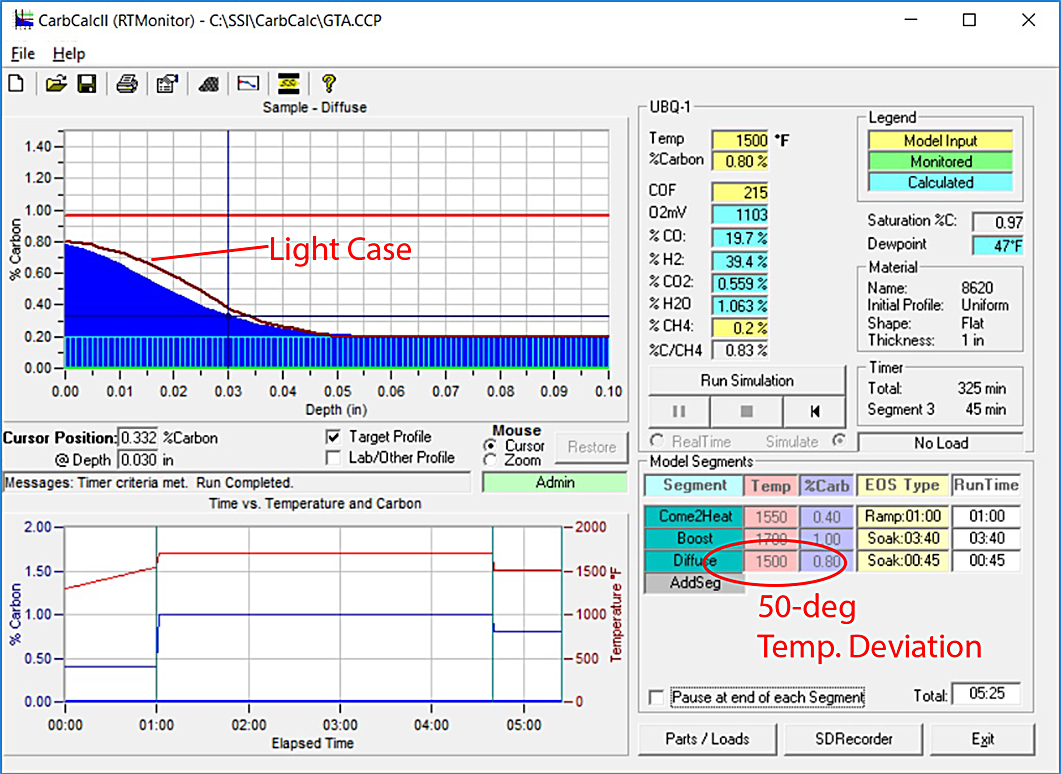
For example, Figure 3 and Figure 4 show an 8620 material with a cycle of just over five hours. The desired and assumed temperature is 1,750°F for the boost phase and 1,550°F during the diffuse phase. In Figure 4, the temperature is reduced by just 50°F, resulting in light case due to the carbon not diffusing to the desired depth.

Low Hardness
Many processes have reduced austenitizing temperatures in an attempt to minimize distortion. When the austenitizing temperature is lowered to close proximity of the A3 or Acm temperatures, temperature uniformity becomes critical in preventing the formation of ferrite or carbides in the microstructure.
Conclusion
Understanding the TUS process as it applies to AMS 2750E will allow you to be proactive regarding your requirements and responsibilities as a reliable heat treater. If you are familiar with your equipment and the specification, you can prepare for efficient transitions, minimize downtime, and streamline the process of TUS testing. And if you take the time to document the process for future surveys, you can save time and money in the long run by enabling yourself to identify problems before they are too late to prevent.


